How I turned a GitHub repository into a published PDF book
Tue Jul 18 2023
My book From PHP to Python: A Straight-to-the-Point Guide is available on Gumroad in PDF and ePub, and on Amazon in Kindle version.
I wanted my PDF to look exactly as desired. It took me a lot of time, effort, patience and hacks to make it work, but it was worth it. Take a deep breath, my journey was not that easy.
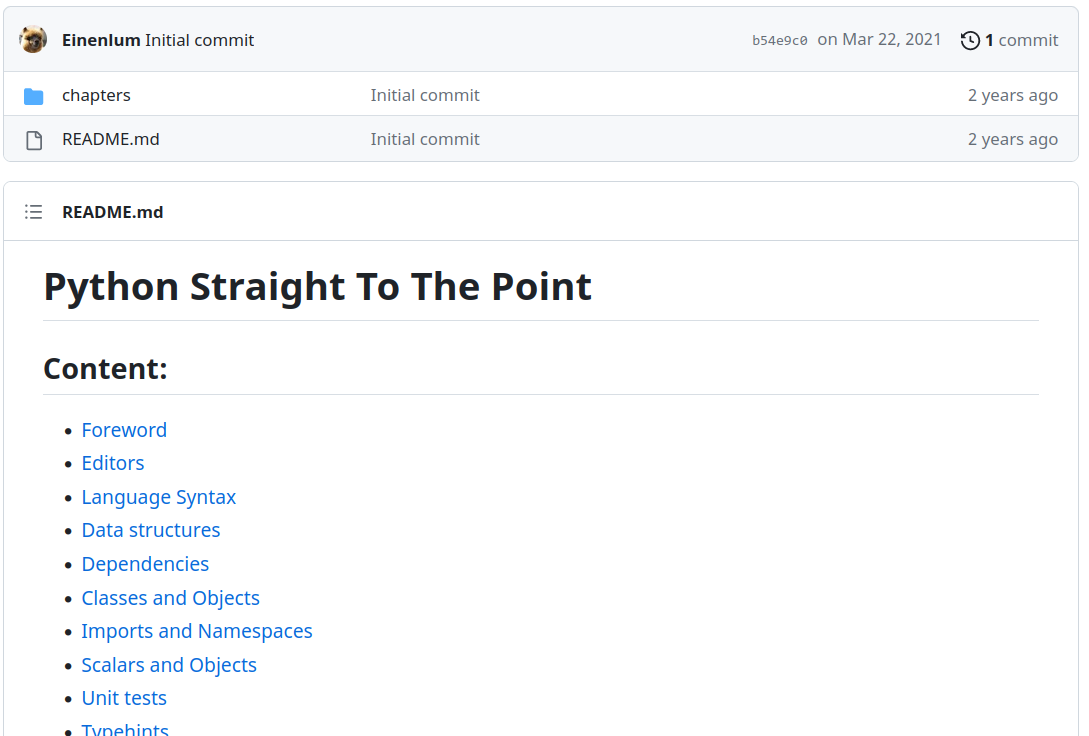
I started writing my book in 2021. At that time, I opened a private GitHub repository and I wrote everything in Markdown. This was the perfect format. I could focus on writing content and I could version it.
My book had a different temporary name back then.
I didn’t know exactly how my project would end. Will it be an open-source repository? Will it be a website? Will it be a self-published book? Will it be a book published through professional publishers? I didn’t want to think about it.
I just needed to get some work done. Writing in Markdown allowed me to postpone many questions that were not necessary. Markdown allows highlighted code blocks, headings and formatting. It also allows linking images. I just added a chapters directory and listed them in order in a README.md file. I also added an assets/img directory and linked every image through a relative path in my chapters.
Some chapters included an equivalent of “Did you know? / Hints” inserts and I decided to temporarily declare them like this, with custom “tags”:
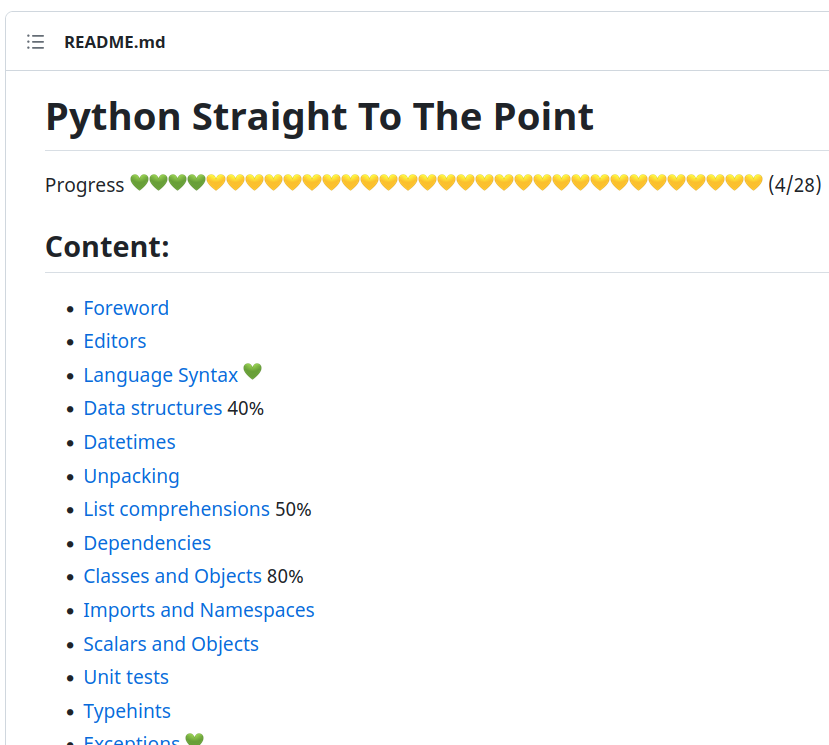
I added later a progress indicator to have a clearer view of what was done and what needed work. It kept me motivated.
After a year and a half, I felt like the content of my book was almost ready. I decided it would be a published book (whether by myself or by professional publishers). I needed a way to export it to a readable format for proofreading and to send to publishers. PDF was my first choice because I wanted my book to look the same way everywhere. And after all… Transforming Markdown to PDF should be quite easy. Right?
Here is what I ended up with today: PDF sample chapter. Let’s look at my journey to get there.
Exploring existing tools
I started looking for some existing solutions, and I had some requirements in mind:
- The build should be reproducible and automatic (I should just be able to change some chapter content or add a new chapter and create my PDF again through the command line)
- I wanted syntax highlighting
- My book was about PHP and Python and it contained a lot of PHP and Python code next to each other: there should be a clear indication to the reader when some code is Python or PHP.
- I wanted a generated Table of Contents
- The solution should work on Linux
Some people mentioned Pandoc but I felt like I lacked some control over the output: adding inserts and differences between PHP and Python code seemed complicated (today with a better understanding of Pandoc, maybe I could give it a new try, not sure).
Others talked about Asciidoctor which sounded nice but I didn’t want to write all my content again from Markdown to AsciiDoc. I also felt a lack of control over inserts and code blocks.
I looked at LaTeX: I know many scientific papers use it and the output is great. Learning a new language and converting all my markdown files sounded like hell. I knew Pandoc could help here, but it felt like a huge and uncertain task. Also, I was not sure it was worth it, since, again, I needed some specific control over the code blocks.
“Hey, I know Python after all”
After all this research period I thought that maybe Python could do the trick. After all, I was writing a book about it, and building a pipeline to generate my Python book sounded quite fun and meta. Let’s do this!
Here are the steps I had in mind:
- Take all my Markdown files (use the README as a guide to know their order)
- Merge all of them in a giant Markdown file
- Find a way to change the
//boxand//endboxtags into a proper insert through custom divs. - Transform the file into HTML
- Add some CSS
- Transform it into a PDF
I created another private repository, dedicated to book generation.
I added a .gitignore file in a data directory and copied my book content in it. From there I could start working.
Markdown to HTML
I found a few Python libraries that could do the job. python-markdwon2 worked quite well but I needed to tweak it a bit. I needed to add a custom class to my code blocks to know if the code was PHP or Python (to then style them differently). Adding these steps was difficult with this library and I gave up (although the author seems to be working on this custom extra feature).
I finally used python-markdown which did the job I wanted: it allowed extensions like SuperFences and allowed me to quite easily tweak some behavior. After a few questions and tries, I managed to have a very basic working generator.
All has changed a bit over the year, getting tweaked step by step, but here is what I started with:
# bookgen/fetch.py

import re

# From the README file, take every line and extract the chapter filename
# Since the README is the one deciding the order, we can easily change
# the order of chapters just by changing the README
def get_chapter_files(readme_path):
    readme_lines = _get_readme(readme_path)

    chapter_lines = (line for line in readme_lines if line.startswith("-"))
    chapter_files = []

    for chapter_line in chapter_lines:
        m = re.search(r"\[(.*)\]\((?P<file_name>.*)\)", chapter_line)
        chapter_files.append(m.group("file_name"))

    return chapter_files


def _get_readme(readme_path) -> list[str]:
    with open(readme_path, "r") as f:
        return f.readlines()
# bookgen/converter.py
import markdown
from pymdownx.superfences import fence_div_format
def convert_to_html(
content, # the merged Markdown content
base_directory,
template_path, # an HTML template where we will put our transformed content
included_stylesheets, # inline stylesheets
linked_stylesheets # external stylesheets
):
extras_markdown = [
# https://python-markdown.github.io/extensions/nl2br/
"nl2br",
# https://facelessuser.github.io/pymdown-extensions/extensions/superfences/
"pymdownx.superfences",
# https://facelessuser.github.io/pymdown-extensions/extensions/highlight/
"pymdownx.highlight",
"tables"
]
html_content = markdown.markdown(
content,
extensions=extras_markdown,
extension_configs={
"pymdownx.superfences": {
# This allows to use a custom code formatter for each language
"custom_fences": [
{
"name": "python",
"class": "class_container",
"format": _code_custom_formatter,
},
{
"name": "php",
"class": "class_container",
"format": _code_custom_formatter,
},
{
"name": "shell",
"class": "class_container",
"format": _code_custom_formatter,
},
]
},
"pymdownx.highlight": {
# add the language as a class to the pre tag
"pygments_lang_class": True,
"extend_pygments_lang": [
{
"name": "php",
"lang": "php",
"options": {
# highlight PHP code even there is no <?php tag
"startinline": True,
},
},
{
"name": "python",
"lang": "python",
},
],
},
},
)
with open(template_path) as f:
template = f.read()
html_content = _replace_boxes(html_content)
html_content = _inline_images(base_directory, html_content)
template = _include_stylesheets(template, included_stylesheets, linked_stylesheets)
html = template.replace("{{content}}", html_content)
return html
# I needed to have a div wrapper with the language name as a class
def _code_custom_formatter(source, language, class_name, options, md, **kwargs):
code_block = md.preprocessors["fenced_code_block"].extension.superfences[0][
"formatter"
](source, language, options, md, **kwargs)
return f'<div class="codeblock-{language}">{code_block}</div>'
# Here we change all our // box and // endbox to make a special div
def _replace_boxes(html: str) -> str:
html = html.replace("<p>// box</p>", '<div class="box">')
html = html.replace("<p>// endbox</p>", "</div>")
return html
def _include_stylesheets(html, included_stylesheets, linked_stylesheets):
linked = ""
for stylesheet_link in linked_stylesheets:
linked += f'<link rel="stylesheet" href="{stylesheet_link}">\n'
content = ""
for stylesheet in included_stylesheets:
with open(stylesheet, "r") as f:
content += f.read()
content += "\n"
html = html.replace("{{linked_stylesheets}}", linked)
html = html.replace("{{included_stylesheets}}", content)
return html<!-- assets/template.html -->
<html>
<head>
<meta charset="utf-8" />
<link rel="preconnect" href="https://fonts.googleapis.com" />
<link rel="preconnect" href="https://fonts.gstatic.com" crossorigin />
<link
href="https://fonts.googleapis.com/css2?family=Alegreya+Sans:ital,wght@0,100;0,300;0,400;0,500;0,700;0,800;0,900;1,100;1,300;1,400;1,500;1,700;1,800;1,900&display=swap"
rel="stylesheet"
/>
<style>
{{included_stylesheets}}
</style>
{{linked_stylesheets}}
</head>
<div id="coverpage"></div>
<div id="contents">{{content}}</div>
</html># main.py
from pathlib import Path
import os
from bookgen.converter import convert_to_html
from bookgen.fetch import get_chapter_files
DIRECTORY = f"{os.getcwd()}/data"
README = f"{DIRECTORY}/README.md"
TMP_OUTPUT_DIRECTORY = "/tmp/pdf_sttp"
Path(TMP_OUTPUT_DIRECTORY).mkdir(parents=True, exist_ok=True)
TMP_HTML_FILE = "generated_book.html"
TMP_HTML_PATH = f"{TMP_OUTPUT_DIRECTORY}/{TMP_HTML_FILE}"
INCLUDED_CSS_FILES = [
f"{os.getcwd()}/assets/custom.css",
]
LINKED_CSS_FILES = []
TEMPLATE_PATH = f"{os.getcwd()}/assets/template.html"
table_of_contents = get_chapter_files(README)
def _merge_md_content(table_of_contents: list[str]) -> str:
content = ""
for file in table_of_contents:
with open(f"{DIRECTORY}/{file}", "r") as f:
# Before each chapter, add a page break
content += '<div class="pagebreak"></div>\n\n'
content += f.read()
return content
content = _merge_md_content(table_of_contents)
html = convert_to_html(
content,
DIRECTORY,
TEMPLATE_PATH,
INCLUDED_CSS_FILES,
LINKED_CSS_FILES,
)
with open(TMP_HTML_PATH, "w") as f:
f.write(html)With these few files, I was able to generate a rough version of my book in an HTML file.
How to transform it into a PDF file?
A few options were available to me. I knew wkhtmltopdf (deprecated recently), but the output was not that great. I quickly tried Puppeteer but the result was also not perfect.
After looking at some resources it seemed like Prince was the best tool to make beautiful PDFs from HTML. There was a big issue though. The pricing. A desktop license for Prince costs $495. Investing so much to generate a book that could generate almost no money was a deal breaker. Fortunately, DocRaptor, is a SaaS allowing to send HTML through API and transform it into PDF using Prince under the hood.
I am not related to DocRaptor, this is not sponsored content. Let me tell you I just love their service. It’s amazing. The Pricing is really good: for free, you get 5 PDFs per month and unlimited tests (where they add a watermark on every page). This means you can make as many tries as you want for free until you are ready to generate a production version. And even if you need more production copies, the pricing is really honest ($15 per month, and you can cancel anytime, for 125 MB). It’s the kind of service I’m really happy to pay. The documentation is great and their customer service is also super good: you can easily contact a member of the team and they quickly try to help you. I contacted them several times for some CSS issues and they properly investigate and give you a solution, using your input. It’s one of the best services I have used these last few years.
Ok, so how to transform our HTML to PDF using DocRaptor? They have a very easy-to-use Python SDK (but also PHP, Ruby, and others: check their documentation).
I added two environment variables (one for the DocRaptor token, and one to know if we are publishing it in production, without watermark: default to False).
# bookgen/client.py
from os import environ
import docraptor
docraptor_token = environ.get("DOCRAPTOR_TOKEN")
doc_api = docraptor.DocApi()
doc_api.api_client.configuration.username = docraptor_token
publish_prod = bool(environ.get("PRODUCTION", False))
# file_path is the path of our generated HTML file
def publish(tmp_output_directory: str, file_path: str):
if not docraptor_token:
raise Exception("DOCRAPTOR_TOKEN not set")
with open(file_path) as f:
content = f.read()
response = doc_api.create_doc(
{
"test": not publish_prod, # test documents are free but watermarked
"document_content": content,
# the name it will appear as on DocRaptor Dashboard
"name": "sttp.pdf",
"document_type": "pdf", # (could also be xls or xlsx)
"javascript": True, # enable JavaScript processing
}
)
output_path = f"{tmp_output_directory}/sttp.pdf"
# open file as writeable and binary
with open(output_path, "wb") as f:
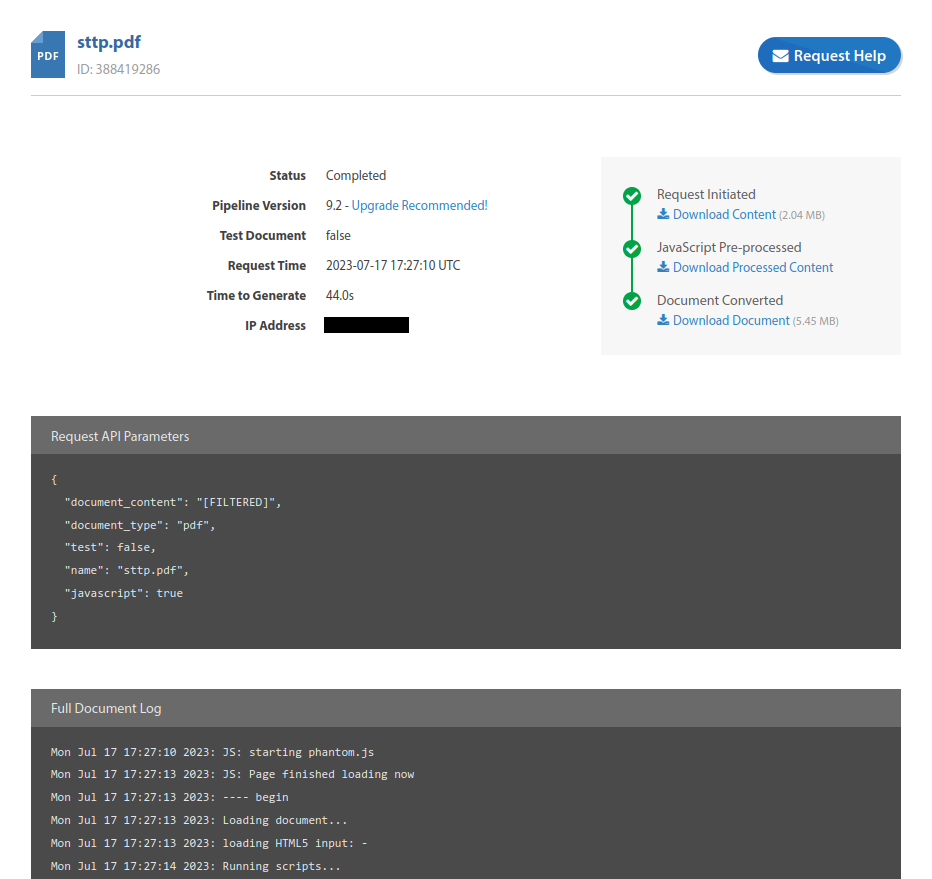
f.write(response)I added an option in my main file to publish the PDF or just generate the HTML file.
Now I get a fresh /tmp/pdf_sttp/sttp.pdf file every time I launch my script. I can also find the list of all my generated PDFs on my DocRaptor dashboard.
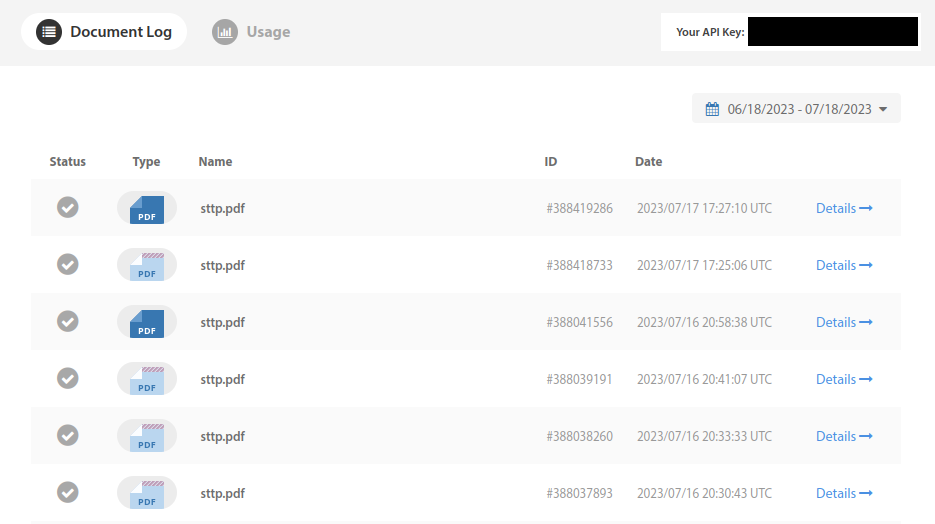
And for every document I get a log, the HTML content I sent, the processed HTML (after Javascript has run) and the final PDF output. I can also easily request help for this specific file.
Images issues
It works very well, but my images were missing (already in my local HTML file) since I use relative paths to my local images in my chapters.
I could have decided to export them to an external host and replace all the links in my chapters but it was a lot of work. Also, I like having my few images in my repo. I just change one and it’s updated.
To fix this I decided to encode them into base64.
# bookgen/converter.py

import base64
import re


def _inline_images(base_directory: str, html: str) -> str:
    def replace_image(matchobj):
        image = matchobj.group(1)
        path = f"{base_directory}/{image}"

        with open(path, "rb") as f:
            image_data = f.read()

        binary_64 = base64.b64encode(image_data)
        url_data = binary_64.decode("utf-8")

        return f'<img class="inlined" src="data:image/png;base64,{url_data}">'

    # Since the HTML comes from a very simple markdown conversion
    # it is quite safe to use regexes
    return re.sub(r"<img (?:.+)?src=\"\.\.([^<]*)\"\s*\/?>", replace_image, html)


def convert_to_html(
    content,
    base_directory,
    template_path,
    included_stylesheets,
    linked_stylesheets
):
    # ...

    html_content = _inline_images(base_directory, html_content)

    # ...
    # return our processed HTML
This way my HTML is self-contained.
Emojis
I sometimes had to use some emojis in my book and while it was working well on my machine, they were not displayed correctly on DocRaptor.
The fix I found was to use Twemoji, an open-source library made by Twitter that looks for emojis in your text and replaces them with images.
<!-- assets/template.html -->

<html>
  <head>
    <!-- ... -->
    <style>
      {{included_stylesheets}}
    </style>
    {{linked_stylesheets}}
    <script
      src="https://unpkg.com/twemoji@latest/dist/twemoji.min.js"
      crossorigin="anonymous"
    ></script>
  </head>

  <!-- ... -->

  <div id="contents">{{content}}</div>

  <script>
    // The magic happens here
    window.onload = function () {
      twemoji.parse(document.body, {
        base: 'https://cdn.jsdelivr.net/gh/twitter/twemoji@14.0.2/assets/',
      });
    };
  </script>
</html>
Page breaks and CSS tweaks
To get the page size right I used the @page rule in my CSS:
/* assets/custom.css */

@page {
  size: 10in 16in;
}

div.pagebreak {
  page-break-before: always;
}
I added a specific div for my cover page in my HTML template:
<!-- assets/template.html -->

<div id="coverpage"></div>

<div class="pagebreak"></div>
Instead of encoding it into base 64 I hosted it somewhere on the internet and then added this to my CSS:
/* assets/custom.css */

@page coverpage {
  margin: 0;
}

#coverpage {
  page: coverpage;
  height: 16in;
  width: 10in;
  background-image: url('https://....png');
  background-size: 10in 16in;
}
I have a lot of custom CSS to make my document exactly as I want, but there’s probably nothing so interesting to show there. Just regular CSS.
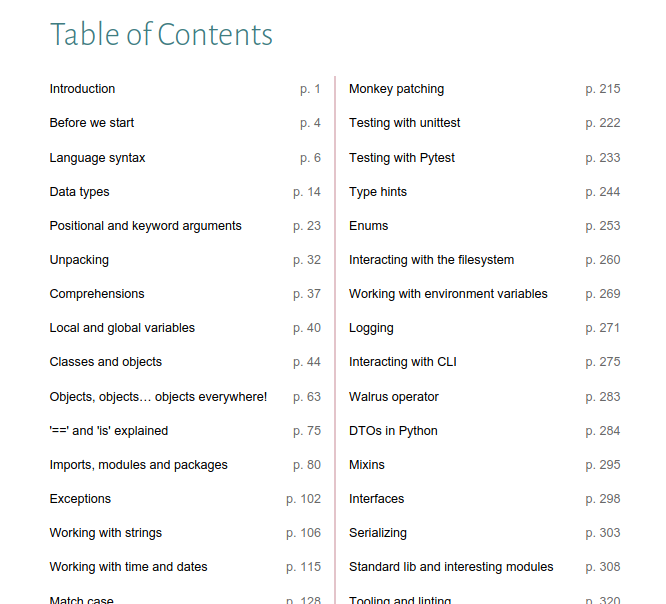
Table of Contents
Generating the Table of Contents needs to be done by DocRaptor in Javascript, after a first parsing of the HTML content, since we need to know the page number of every chapter before generating it.
DocRaptor has documentation about it. The script is quite ugly but it works.
First, I displayed the page number at the bottom of every page that is in #contents.
/* assets/custom.css */

#contents {
  counter-reset: page 1;
  display: block;
  page: contents;
}

@page contents {
  padding-left: 10px;
  padding-right: 10px;

  @bottom {
    content: counter(page);
  }
}
There is some prince magic there, don’t ask me, it just works.
I added a section for my Table of Contents in my template.html file.
<!-- assets/template.html -->

<!-- ... -->
<div id="toc">
  <h1 id="toc-title">Table of Contents</h1>
  <div id="toc-content">
    <ol id="toc-ol"></ol>
  </div>
</div>

<!-- ... -->
The documentation from DocRaptor shows how to generate a full Table of Contents (with multiple heading levels). I just wanted to display first-level headings so I adapted the script a bit.
<!-- assets/template.html -->

<script>
  window.onload = function () {
    /* the previous twemoji magic is here */

    const createLiElement = function (text, anchor) {
      const liElement = document.createElement('li');
      const aElement = document.createElement('a');
      const spanChapterElement = document.createElement('span');
      const spanPageElement = document.createElement('span');

      spanChapterElement.className = 'toc-chapter';

      aElement.href = '#' + anchor;
      aElement.textContent = text;
      spanChapterElement.appendChild(aElement);

      spanPageElement.className = 'toc-page';
      spanPageElement.setAttribute('data-href', '#' + anchor);
      spanPageElement.textContent = '';

      liElement.appendChild(spanChapterElement);
      liElement.appendChild(spanPageElement);

      return liElement;
    };

    const createH1 = function (text, anchor) {
      const h1Element = document.createElement('h1');

      h1Element.id = anchor;
      h1Element.textContent = text;

      return h1Element;
    };

    var toc = '';
    const content = document
      .getElementById('contents')
      .innerHTML.replace(/<h1>([^<]+)<\/h1>/gi, function (_, titleText) {
        const anchor = titleText.replace(/[. ]/g, '_');

        const liElement = createLiElement(titleText, anchor);
        toc += liElement.outerHTML;

        return createH1(titleText, anchor).outerHTML;
      });

    document.getElementById('contents').innerHTML = content;
    document.getElementById('toc-ol').innerHTML = toc;
  };
</script>
I could then tweak my CSS to stylize the Table of Contents.
#toc li span.toc-page::before {
  content: '';
  display: block;
  left: 0;
  margin-top: 1.8rem;
  position: absolute;
  right: 2rem;
}

/* Add page number in table of contents */
#toc li span.toc-page::after {
  content: ' p. ' target-counter(attr(data-href), page);
  font-weight: normal;
}

#toc li span.toc-page {
  float: right;
}

#toc li a.toc-page {
  float: right;
}

#toc li {
  margin-bottom: 10px;
  margin-left: 0;
  padding-left: 0;
  list-style-type: none;
  line-height: 2em;
}

#toc ol {
  position: relative;
  column-count: 2;
  column-gap: 40px;
  column-rule: 1px solid #ae5766;
}

#toc li {
  display: table;
  font-weight: 400;
  margin-bottom: 0.8rem;
  margin-left: 0;
  width: 100%;
}

#toc li .toc-page:before {
  content: '';
  display: block;
  left: 0;
  margin-top: 1.8rem;
  position: absolute;
  right: 4rem;
}

#toc li > a {
  display: inline-block;
  width: 100%;
}
#toc li a:hover span {
  font-weight: 600;
}
#toc li a:hover .toc-page:before {
  border-bottom-width: 2px;
}

#toc a {
  color: black;
  text-decoration: none;
  font-weight: normal;
}
After a few tweaks and more CSS and HTML tricks, I got a working and clickable Table of Contents.
The syntax highlighting issue
Syntax highlighting was a huge topic for me. This was one of the deal breakers that made me cancel my contract with the publisher I had signed with and go my path.
I wanted PHP and Python code to look different. I wanted to display a small icon to represent each language on top of each code block, and even to have two different syntax highlighting themes.
Pygments, the Python library python-markdown uses to highlight code has a few built-in themes. I couldn’t find a way to use a different theme for each language. After a lot of investigation, I decided to create a Python script to patch all styles from Pygments to add my proper classes.
pygments has a CLI command called pygmentize allowing to export the pygments styles to a CSS file.
pygmentize -S <styleName> -f html -a .someClassNameToAppend > fileName.cssThe -a option allows to append a specific class to all selectors of a style while exporting it. This is very useful to me since I can then export a style for PHP and another one for Python and use both in my document without them colliding.
I needed to extract the background color of the current theme to apply it to a wrapper div. I also wanted to generate each version of the theme for both PHP and Python, so that I can very easily try things and switch between themes.
Here is the script I ended up with:
# style_generator.py

import os
import re

languages = ["php", "python"]

# All the themes I was interested in
styles = [
    "arduino",
    "dracula",
    "friendly",
    "fruity",
    "github-dark",
    "gruvbox-dark",
    "gruvbox-light",
    "inkpot",
    "lovelace",
    "material",
    "native",
    "nord",
    "nord-darker",
    "one-dark",
    "paraiso-dark",
    "solarized-dark",
    "solarized-light",
    "stata-dark",
    "stata",
    "stata-light",
    "trac",
    "tango",
    "zenburn",
]

# What is common to Python, PHP and shell
# .codeblock-<language> is a wrapper added by the
# super fenced blocks extension to each codeblock
# through my custom code formatter we saw earlier
common_append = """
.codeblock-php, .codeblock-python, .codeblock-shell {
    margin-top: 10px;
    margin-bottom: 20px;
    padding-top: 2px;
    padding-bottom: 2px;
    padding-left: 10px;
    border-radius: 5px;
    box-shadow: 0px 0px 3px 0px rgba(0,0,0,0.75);
}

.codeblock-shell {
	border-radius: 3px;
	background-color: #1F2E1F;
	color: #FFFFFF;
}

"""

appends = {
	# use common_append + specific rules for PHP
    "php": common_append
    + """
    /*
        Comments are too dark
        .c1 is the class for single-line comments in Pygments
        .cm is the class for multi-line comments
    */
    .codeblock-php pre code span.c1, .codeblock-php pre code span.cm {
        color: hsl(220, 28%, 70%);
    }

    .codeblock-php {
        /*
           A variable we declare later and set
           to the color we extract from the theme
         */
        background-color: var(--code-php-bg);

        /* The PHP logo encoded into base64 */
        background-image:  url('data:image/png;base64,...');
        background-position: right 5px top 5px;
        background-repeat: no-repeat;
        background-size: 1.3em;
    }

    """,

	# Same here, we apply the common rules + add Python ones
    "python": common_append
    + """
    /*
        Comments are too dark
        .c1 is the class for comments in Pygments
    */
    .codeblock-python pre code span.c1 {
        color: hsl(30, 21%, 74%);
    }

    /*
        backslashes are too dark because they have
        no span and no class… it's weird
        So we set a default white color
        if nothing is specified in the theme
    */
    .codeblock-python pre code {
        color: #fff;
    }

    .codeblock-python {
        /*
           A variable we declare later and set
           to the color we extract from the theme
         */
        background-color: var(--code-python-bg);

		/* The Python logo encoded into base64 */
        background-image: url('data:image/png;base64,...');
        background-position: right 5px top 5px;
        background-repeat: no-repeat;
        background-size: 0.9em;
        border-radius: 3px;
    }

    """,
}

# For each language (php and python)
for language in languages:
	# for each style (arduino, dracula…)
    for style in styles:

		# The patched CSS will be stored in
		# assets/pygments-styles/python/arduino.css
		# or assets/pygments-styles/php/arduino.css
		# etc.
        file_path = f"./assets/pygments-styles/{language}/{style}.css"

		# We first extract the style from Pygments to this path
        cmd = f"pygmentize -S {style} -f html -a .language-{language} > {file_path}"
        os.system(cmd)

		# The regex to fetch the background color of the theme
        regex = r"\.language-(php|python) \{ background: (\#.+); .*\}"

        with open(file_path, "r") as f:
            content = f.read()
            matches = re.findall(regex, content)
            if len(matches) > 0:
                _, color = matches[0]
                # color contains the background color of the theme

                bg_var_name = f"--code-{language}-bg"

				# We replace the #color by the var(--code-mylanguage-bg)
                content = content.replace(color, f"var({bg_var_name})")

				# We add a :root CSS variable --code-mylanguage-bg: #A0...
                content = f":root {{ {bg_var_name}: {color}; }}\n\n{content}"

                to_append = appends[language]

				# We append what is needed to the CSS file, specific for the language
                content = f"{content}\n{to_append}"

        with open(file_path, "w") as f:
	        # We update the file
            f.write(content)
Now after launching python style_generator.py, I have a list of patched styles for each language that will not collide with each other.
~ tree assets/pygments-styles
assets/pygments-styles
├── php
│   ├── arduino.css
│   ├── dracula.css
│   ├── friendly.css
│   ├── fruity.css
│   ├── github-dark.css
│   ├── gruvbox-dark.css
│   ├── gruvbox-light.css
│   ├── inkpot.css
│   ├── lovelace.css
│   ├── material.css
│   ├── native.css
│   ├── nord.css
│   ├── nord-darker.css
│   ├── one-dark.css
│   ├── paraiso-dark.css
│   ├── solarized-dark.css
│   ├── solarized-light.css
│   ├── stata.css
│   ├── stata-dark.css
│   ├── stata-light.css
│   ├── tango.css
│   ├── trac.css
│   └── zenburn.css
└── python
    ├── arduino.css
    ├── dracula.css
    ├── friendly.css
    ├── fruity.css
    ├── github-dark.css
    ├── gruvbox-dark.css
    ├── gruvbox-light.css
    ├── inkpot.css
    ├── lovelace.css
    ├── material.css
    ├── native.css
    ├── nord.css
    ├── nord-darker.css
    ├── one-dark.css
    ├── paraiso-dark.css
    ├── solarized-dark.css
    ├── solarized-light.css
    ├── stata.css
    ├── stata-dark.css
    ├── stata-light.css
    ├── tango.css
    ├── trac.css
    └── zenburn.css
These files are git-ignored.
So, why did we do this? Because now in my main.py file I can just change the name of the CSS file and everything is updated for Python and PHP without colliding.
# main.py

# ...

INCLUDED_CSS_FILES = [
	# here we use gruvbox dark for Python
    f"{os.getcwd()}/assets/pygments-styles/python/gruvbox-dark.css",
    # we use nord for PHP
    f"{os.getcwd()}/assets/pygments-styles/php/nord.css",
    f"{os.getcwd()}/assets/custom.css",
]

# ...
If I want to change the theme for PHP tomorrow, I just include a different assets/pygments-styles/php/STYLESHEET.css file. Same for Python.
This allowed me to make proper tests and super easily switch from theme to theme without pain.
There is a lot more going on in my assets/template.html and in my assets/custom.css. But you got the gist of it.
Merging my book repository and my book-generator repository
After being quite happy with the result, I decided to merge both my repositories (the one to generate the book, and the content itself) so that every change to the PDF (whether it’s the style or the content) is versioned and I can go back to it and generate this specific state again if needed.
Now I can use git tags for every minor and major version of my book. Every time I publish a release on my private GitHub repository I also add my PDF file as binary attachment so it’s quite easy to follow. I also have a way to go back in time and generate something from a previous state, which could be useful for any reason.
Sample chapters
I always offer the same two sample chapters of my book for free. After having generated the new version of my PDF, I use pdftk to extract these chapters as sample PDFs.
pdftk /tmp/sttp.pdf cat 135-141 output /tmp/match-case.pdfI then add them on an S3 Bucket (on DigitalOcean) in a folder with the number version.
I then update my blog to update redirections. I have a vercel.json file so that einenlum.com/books/fromphptopython/sample-chapters/match-case.pdf redirects to the right file in my bucket.
This is a thing I would like to automate a bit more (the pdftk + upload sample chapters), but maybe I’ll do that later when I have time.
Conclusion
Writing the content of a book is a huge work. But if you decide to publish your book by yourself, it’s just a part of the journey. You then have to find a way to generate the book of your dreams.
I could have gone for an easier way, for sure.
But now I have the book I exactly want. I have full control of everything and this feels amazing. It’s a great feeling to know that if there’s anything I want to change, I’m on board.
Oh, I forgot to mention I have a Makefile to make things easier.
# To be generated only once before generating HTML
generate_styles:
	poetry run python style_generator.py

generate_pdf_html:
	poetry run python main.py

publish_pdf_test:
	poetry run python main.py -p

publish_pdf_prod:
	PRODUCTION=1 poetry run python main.py -p
And the best part?
Now it’s built, I can just focus on writing. If I want to add a chapter, I create a markdown file in my chapters directory and add it to my README.md to know where to place it in the book.
Then I just do:
export DOCRAPTOR_TOKEN=MYTOKEN
make publish_pdf_prod
And in less than one minute, I have my perfect PDF on my file disk.
If you’re a writer and want to create your book, I hope this blog post gave you some ideas about how you can create something that looks like you. I don’t think I will open source my book generator since it’s so specific to my needs and an ad-hoc solution. This was just a few hints about tools you can use.
Next time, we will talk about how I generated my ePub from my Markdown files (quite another journey on its own!).